14 April 2011
Ocean Wood Sign Details
Here's the quick scoop on this Ocean Wood project.
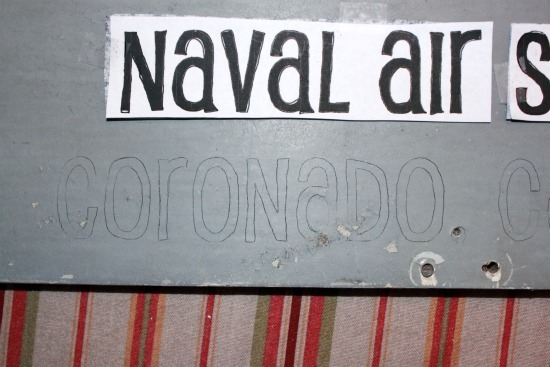
1) I decided what I wanted it to say, found a font I liked. I thought the address of the beach would be a fun way to go, as if it might've been a sign that was posted there once. Then I had to size the letters to fit the board. I experimented with font sizes in Word until I got it right. Then cut them all out and played with the layout for a while.
2) Went on a search for Carbon Paper -- a tool so old I couldn't remember what it was even called. Had to go to two big office supply stores to find it -- and of course they only sell it in 100 packs. I needed two sheets. Carbon paper, anyone? I am sure I will use it again, but certainly have enough to share.
3) Cut the carbon paper to fit each strip of my word papers and I used tape to attach them to my word strips so I could move them around more easily. I would use double stick, but I couldn't find mine when I needed it. Of course when I need one sided tape, I can only find double sided tape.
I should note, okay confess, here that I did an experiment strip on plain white paper just to make sure the words would transfer with the carbon paper. Unfortunately I did not have the carbon paper face down, so it copied to the back of my word strip. Not very smart. But once I started working on the wood, it worked like a charm.
4) I did about 30 days worth of measuring (not really but it felt like it) to get all the strips centered from top-to-bottom and side-to-side. This was a very frustrating process because of the number of strips. It seemed like as soon as I got 3 rows perfect one would be totally off. I reworked this I don't know how many times.
5) Traced the letters onto the wood.
6. Removed all the paper strips, carbon paper and tape.
7. Then painted. I mixed my own blue paint using a dark blue and adding some gray (which I made out of white and black - amazingly enough). I used a very tiny, square edged brush. Then went over it again with a very, very tiny pointed edge brush to touch up corners, etc. I was tired and it was very late at this point - so there will be no photos of the painting..Haa-haa.
8. Then I added the eye hooks on the top. I was planning to use the hinge holes but they are so tiny and are actually sealed up with compacted sand picked up somewhere in the Pacific. I decided I wanted to keep the sand and it would probably hang better this way.
9. Then I cut the ribbon to size. I glued the ends together, but we'll have to see if it holds. If it doesn't I may switch to a metal chain or just sew the ribbon to the eye hooks on the sewing machine or by hand. We'll see. -- Nope didn't work, will have to sew it.
So that's the project. Very detailed but not that difficult. It's fun to have something totally unique, meaningful to us and using found material. You can also see this post linked to A Beach Cottage: Good Life Wednesdays Linky Party. A Beach Cottage is quite a lovely blog with lots of fun content. DIYs, beach house makeover, beautiful photos of Australia and much more. You will definitely enjoy a visit!
This post is also linked to Chic and Crafty Thursdays link up at TheFrugalgirls.com. There are quite a few fun DIY projects, especially for Easter, linked there you might enjoy checking out. You can also find it at I {Heart} My Crafty Cutter party at Serenity Now. This is a fun link up of projects using Cricut, Silhouette, stencils or transfer paper. Great ideas, love the concept!
Subscribe to:
Post Comments (Atom)


8 comments:
This is a fantastic tutorial/project. :) I love the neat weathered look. You did a wonderful job. :) This would be a great addition to my "Crafty Cutter" party tomorrow if you have a chance to stop by!
Thanks for joining my Weekend Bloggy Reading party. Hope you'll visit me at Serenity Now again soon. :)
Thank you so much for taking the time to come by and link this up!!! :)
Your sign looks really great, and I love the beachy feel - you did a great job!
Looks great! I love the colours and using the beach address is such a great idea!
- Andrea
Very cute and beachy. Cheers
Very cute - I love the font you chose, so fun! Thanks for the great tutorial too.
Love the sign. You did a wonderful job! Great tutorial too. Thanks for linking up at Beach Cottage Good Life Wednesdays!
This is great! Thanks for the tutorial...
Your newest fan!
Cricket @ gypsea nurse
Post a Comment